Showing posts with label table. Show all posts

Friday, June 6, 2014

Kitchen Nook for the Newly Weds


Hi Everyone!
 I hope you are all having a wonderful, creative, summer. We just visited our home country, South Africa, in April and May, and I came back all enthusiastic to do STUFF!!

But first, I need to catch up on showing some older projects that got "Left Behind".

About a year ago, when my son and his new wife were getting ready to move into their own place, I saw these cute chairs at Savers, for $5 each. They reminded me of a bentwood chair, but were metal (of course...geez, wouldn't it be a bargain if it was a real bentwood chair...).


This picture was taken after I had already spray painted the frame. It was a bad paint job with beige paint before. The plastic cover screamed "family with small children!" , and somehow I did not think it would fly with my two newly weds. They are very young, and still have a lot of adventures planned before parenthood "cramps their style". 

Luckily I had this sweet fabric that I got a while before that. I intended to add splashes of yellow, grey and aqua to my living room at one point, but somehow never got around to it.
Covering the seats was an easy job, thanks to my handy dandy staple gun.

Pretty, isn't it?
I bet you spotted the turquoise piece of table in the pic, right? How could I not make the table turquoise? It was perfect!! 
I bought this table at  Goodwill years ago.

     It began its new life in my home with a pretty red, distressed coat. In the early years I never painted with a brush, always spray painted. Now it's just the opposite. But, all this to say, this table was spray painted red and glazed with black. If I could find out how to add a link with my iPad, I would link you to that post, but, until I learn how, you will just have to either believe me or go look for it on my blog. ( sorry!!)


I loved it just like that for many years, but now it was time for a change yet again.
I painted it with paint I already had on hand. It came in handy, since we were also moving, and I wanted to get rid of some of my open paint containers.

Of course it also got some very light distressing and a smudge of charcoal glaze.

...and there it is! A fresh, sweet breakfast nook for the newly weds! ( the fourth chair was late, and could unfortunately not make it in time for the picture.. ;). )
Spot the chaos of moving boxes in the background.

I'm very happy how this little set turned out. So bright and cheerful, don't you think? 

Well, hopefully this inspired you into some action, if you needed a little kick in the bee hind! 

                                        Cheers!!
                                        

                                      Suzanne.....


Tuesday, April 9, 2013

Faux Pewter Desk


Hi Girls! (Guys, Dudes, Peeps, Friends, Ladies, and Gentlemen)

I know I promised I would post about another French desk next..but you know better than to believe me by now, right? I also said I was going to stop saying the F word on occasion, drink less wine, eat less, and work out more. Bwhahahaha!
Although, I did join CrossFit and am going three times a week, and it turns out I love it! Who knew I was such a masochist ? LOL
One of these days I will be posting pictures of me in my bikini showing off my muscles...
Don't worry! Just kidding! (maybe..)

This is yet another desk, and I am using my standard before picture, because, well, they all look like this more or less...
And yes, I totally planned it this way. I did not forget the before picture...
 
I have been drooling over these kinds of pieces at Worldmarket..

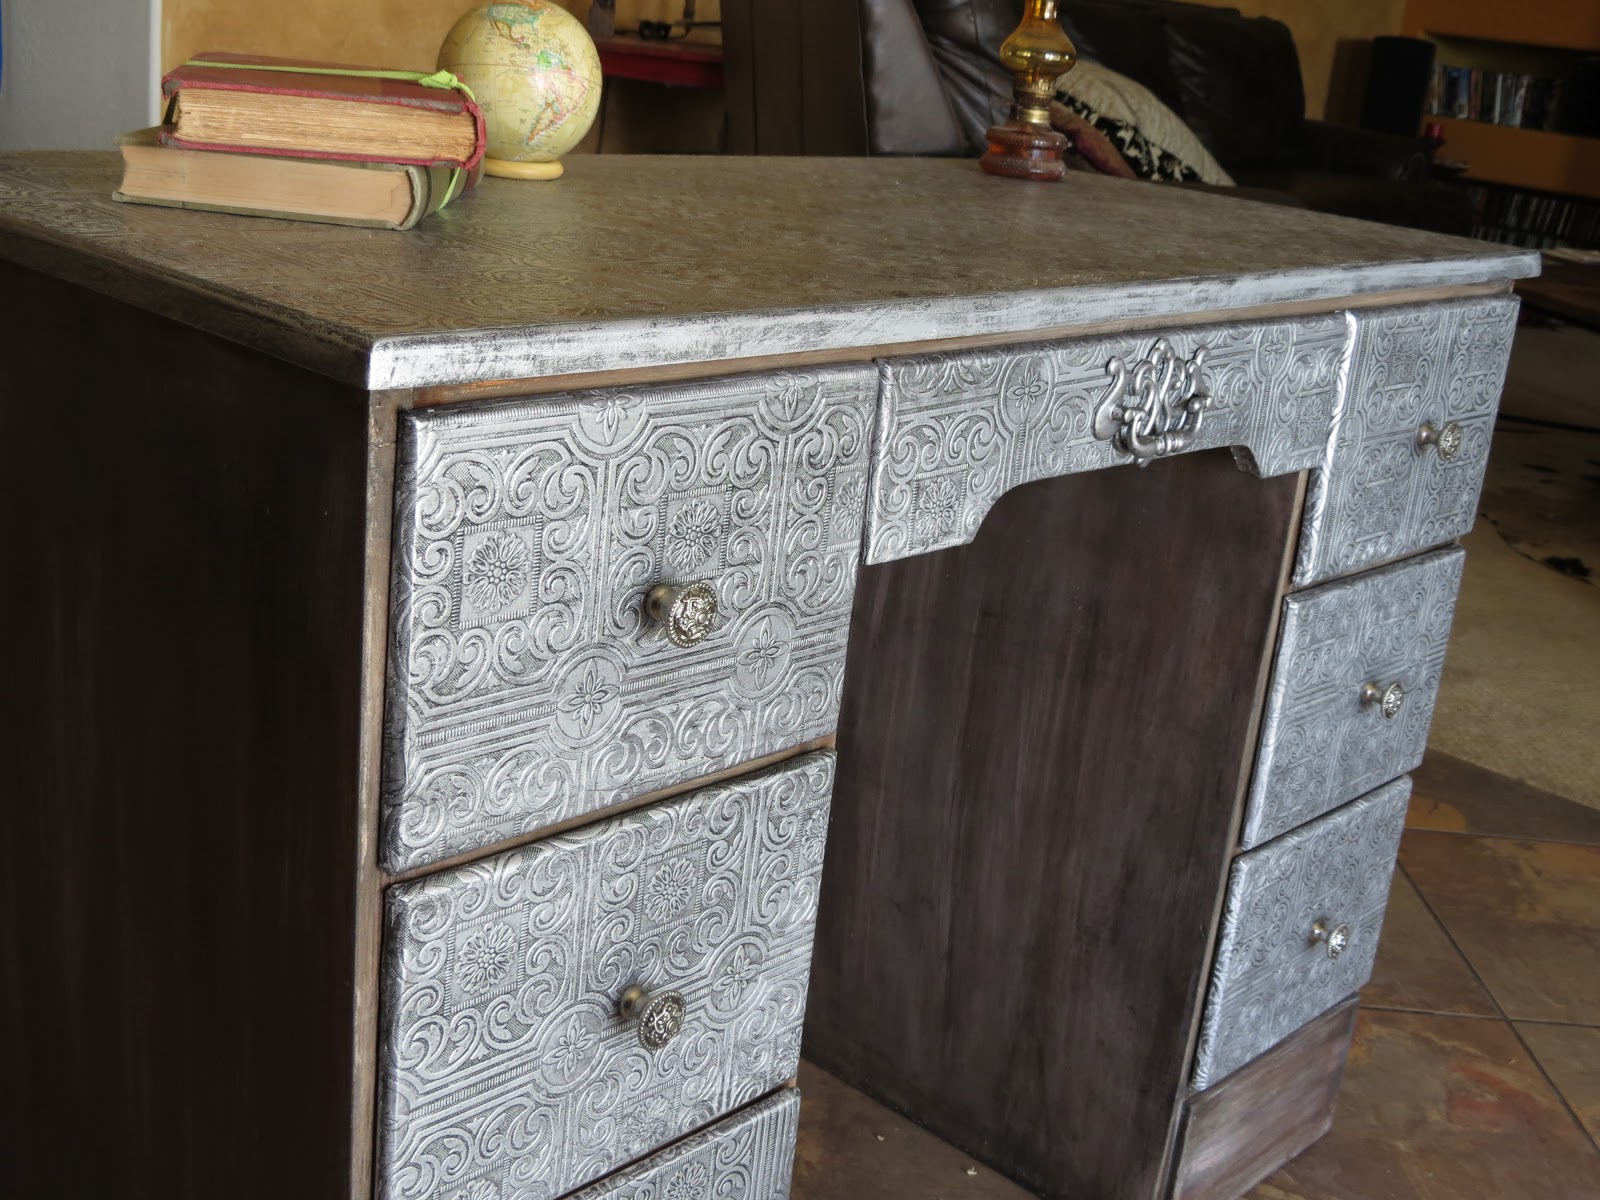
So, I decided to combine the two effects and ended up with this:
I had some trouble with getting the wood part exactly like I envisioned, and I settled for this look, which almost looks like rusted metal to me.
I know, the more professional furniture transformers out there would have practised on a small piece until they got it right, but as our own dear Miss Sweet Brown so
 aptly put it : " Ain't Nobody got Time for That!"   LOL.

 For the drawers and top I used the last of the textured wallpaper that bought about 8 years ago at Lowes. What a great buy that was!  I really hope I can find some more somewhere. It has the look of ceiling tile, don't you think?
 Of course it was white when I put it on, and I  primed and sprayed it with Rustoleum Metallic Silver after the glue had dried.

Then I painted on some charcoal tinted glaze, and wiped it off with a dry rag. ( I'm guessing son no 2 won't be wearing his "holy" underpants again..lol)
 
 It really gives the impression of pewter, don't you think?
 
 The knobs are from Hobby Lobby. At less 50% they were almost as cheap as buying a mish mash at Habitat Restore.

For the middle drawer,  I used an old pull I got off another piece and just painted it to match.
 
 
Of course I sealed it all with a couple layers of MinWax Policrylic.
 
I have to admit that I am really pleased with the end result...
Won't mind keeping it for myself...
 
Ok! Let me hear those comments!
Love
Suzanne
xoxo


Saturday, December 8, 2012

Pop Art Side Table

This is a time for celebrating...whether you are religious or not. Most of us associate the Holidays with seeing loved ones, families getting together, having fun, making memories, etc etc. Why then, is everybody so miserable and impatient and stressed out? Isn't this supposed to be a happy time?

I have a theory about that. What makes us miserable this time of year, is expectations. We are told by the media that this time should be and look a certain way. Happy families smiling in the warm glow of crackling fires, perfect little children with cute outfits playing sweetly together, the smell of good food wafting in from the kitchen, loads of presents under a perfectly decorated tree.....
The truth is that most of our realities are very different from that. And so we start to strive for that picture perfect Christmas .. And if we fail, we strive harder, and become unhappy and stressed out. And what was supposed to be a festive time, becomes the time of year with the highest suicide rate, stress and huge credit card bills.
Maybe we should just relax, and appreciate our own reality for what it is.See the blessings in the little things. Appreciate the people that are with us, instead of being resentful for the one's that are not.
 Maybe we can even reach out and be a blessing to someone else....
Maybe this is my advice to myself, since Christmas started to become such a burden  having to spend it without family since my husband and I moved to the US 10 years ago....
Maybe I will take my own advice and just be happy  this Christmas.

ALRIGHTY THEN!  Enough talking...


Check out this ultra cool little side table I painted a while back. I am sooo stoked about it.  I loved doing it so much, I just want to make more. Even though it's not selling. Go figure. Probably not everyone's cup of tea.

My friend bought me this at a garage sale for $3

I painted the body black, and did this Roy Lichtenstein pop art on the front.
I used my trusted projector to do the drawing.
I googled the image. Funny how I always think I have an original idea, but when I start to google it, I discover that some one else has done it already! I found a lot of cool pop art furniture online.


At first I was thinking of putting something humorous in the thought bubble.
Something like: " I wanted Chick-A_Fillet, but it's Sunday..." 
or any of those First World Problems, but I eventually just went with the original saying, which was:" that's the way it was supposed to happen, but now its hopeless!"
Unfortunately I did not take another pic after I wrote the quote in, before I took the table to the consignment store. 
So, there it is! Hope you love it as much as I do!
Happy Thrifting and (Truly) Happy Christmas !
Joining these parties:
http://diyshowoff.com

https://blogger.googleusercontent.com/img/b/R29vZ2xl/AVvXsEhBcWCmIa_bPEOtSNqlHzVSgihMsdZjbab5Zy8TVkD1dIkmNjm2oNmA07gHa913JkXRzui_SQHnxCRsEe9vaDz303Ht0ciNkBsfpJZ0uTGWFOLa_xTWmjjqbHLGJseCosrKo39wIvhQpDc3/s220/nestwegg2.jpg


Sunday, November 4, 2012

Morningside.....

Happy Halloween to you, happy birthday to me, and happy sugar hangover to whom it may concern.  ;-)

I can't wait to show you my latest project....

My dear friend, Kim  gave me this handmade farmhouse table , chairs and bench. It reminds me of the Neil Diamond song, "Morningside"...
Only this old man did not die and  he did not carve "for my children" on it.....
But I do know that it was made by hand by the father of a big family. After several years of good service, he passed it down to another big family (I'm talking like 7 kids, big), and then finally to my friend, Kim, who currently has 5 children, all ten and under. They used it for a few years, until, finally, a couple of months ago, some of the chairs and even the table started showing signs that it was ready to retire...parts of legs and backs started breaking off, etc.

OR....it was just in  need of some serious TLC.....


I had to use some paint stripper on the table, because I wanted a natural look on the top.
Let me tell you, cleaning these babies was no joke. Just imagine twelve years, 20 children, and lots and lots of meals...
There was so much food stuck in every sneaky corner, I'm telling you, it could keep my entire family alive for quite a few months in the event of a Zombie Apocalypse...or something.
I must have contemplated this aloud, because I'm not sure, but I think I heard Hubby mutter something about feeding my brain to the Zombies instead, since I'm apparently not using it anymore... 

I could not quite get rid of  all the marks, but that's ok, since I still wanted a rustic look.
Since I actually remembered to take pictures during the process, I can now tell you step by step what to do to get the result.
  1. First, clean, of course. We've covered that. No excuses about Zombies, etc, allowed.
  2. Sand all the pieces lightly. 
  3. See that it is going to take forever. Try to guilt hubby into helping.
  4. See that its not working. 
  5. Wonder aloud why you married him.
  6. Say "nothing" when he asked what you said.
  7. Try a different approach. Ask for a new palm sander.
  8. Get said palm sander.
  9. Hug hubby. Say your mother was wrong about him, after all...


10. Using yellow acrylic leftover paint, paint the sides or random places yellow.
11. Let dry, and paint everything a light green, or color of your choice. (In my case whatever I have)
      I painted a rather thick and sloppy layer with a brush, since I wanted it to have the look of several,      old layers of paint, added through the years.


In other places, I did not even bother to cover 100 % with the paint, since I was going to sand it down again, anyway.

12. Wait for it to get dark... (ie. nighttime, not the paint.)
13. Get out trusted Tracer Projector, and trace image of choice onto table.( I did a google search of  cafe signs, and traced it with a black permanent marker.)

 14. Use small brushes and black paint to fill in the letters. ( I used yellow for the shading)
   Remember that this was done on a bare, sanded table.


15. Next day, sand over the letters lightly, and stain whole table top with Minwax Dark Mahogany.

Nice, right? Now back to the chairs and bench....(I'm stopping the numbering of steps, there seems to be way too many) LOL.
After the paint has completely dried, distress by sanding the edges and corners, etc.

 See how the yellow shows through in some places?
Just what I wanted...
After this, I applied a little bit of stain over the sanded areas with a brush, and wiped it off immediately after.
 A little dry brushing with stain in the corners makes it look nice and old.
AND....VOILA!  My new table,  chairs and bench!

I know...I really have to work on my photography skills....and staging!


 I  love how this turned out. 

 A layer of Min Wax Polycrylic sealer was the last step,to protect this little set for many years to come. 


 Let me know what you think, and
Happy Thrifting!

Love,
Suzanne.


Linking up to these parties:
Metamorphosis Monday
Feathered-nest-friday

DIY Show Off

Sunday, October 21, 2012

Super Hero to the Rescue

 This post is long overdue...It seems I am only creating, and not blogging these days. I just have so many ideas swirling around in my head, and I want to do all of them now. 
I'm sure you know the feeling.

I found these chairs and table at my local Goodwill a couple of months ago.
I liked the chairs especially. They were sturdy and retro looking. 

I had plans to do something along the lines of what I did to this bench
 in this post , but then I started thinking about all the super hero movies that are out right now, and I got to thinking. "What if I Modge Podged the table and chairs with some super hero fabric?" But, alas, I couldn't find any such material here in the West Valley at that point.
(Of course, about two weeks later, there they were...4 different rolls of Superman and Captain America!)


So, I did the next best thing... I went to the local Comic Store, and bought a few of the older comics that were on sale.
After I primed and sprayed the legs black, I proceeded to decoupage the rest in strips of comics.


It took forever, but I had sooo much fun doing it!.
The middle of the table is chalk board, painted with homemade chalkboard paint.The recipe I used is :
11/2 TBS un-sanded grout
1 cup acrylic paint in the color of your choice.
Remember to prime the chalk board after it is dry, by covering the whole board in white chalk paint, and wiping it off again.


I'm sorry I did not take more pictures of the process....I have no idea why I didn't.


Well, I hope you like it, and are inspired by it.
Happy Thrifting!
Joining These Parties: