Thursday, March 31, 2011

Grandfather Clock gets its Groove On


Hi Again!

Well, I took my 6 pieces that I had to sell to the The Simple Farm  for the Barnsale today, and , oh my goodness, what an experience to see all the beautiful goods in person! I was speechless....(or ...it might have been the heat, I don't know.....it was something like 94 degrees out there!)

The farm is gorgeous, and a place worth visiting. Go check out their website here.
And, of course, the bloggers did not disappoint....I am going back tomorrow to take lots and lots of pictures.

The last piece I made was really one of my favorites....
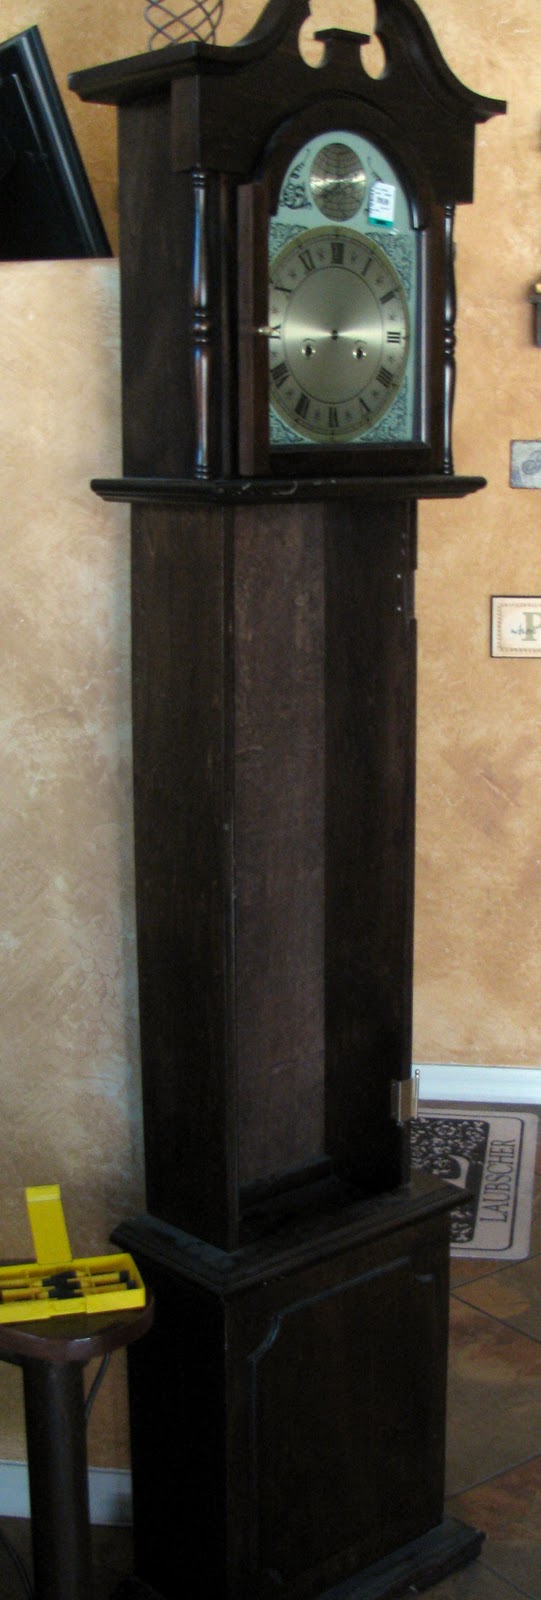
I found this poor grandfather clock at Savers last week...

I liked the look of it, but the door was missing, and the clock did not work anymore.
I still had an idea of what I wanted to do with it...

I took the hinges off that was still left over from the door, filled in the holes with wood filler, and primed the whole thing . I did not use spray paint...aren't you proud of me?

Again, no plan, I just started with what I knew I wanted, and let the piece lead me.
The sides were painted lime green, and then taped off to be painted over with darker green.

Then I taped off over the darker green, in rows, to form diamonds, and painted over again with the same green.

Sounds complicated, but maybe you will get the picture by looking at the pictures! LOL.
The result was this diamond pattern..

Hubby helped me put some shelves in the place where the pendulum and chains used to hang.
We also put in a new battery operated clock mechanism.


I wrote "Take some Time" with old scrabble pieces at the top...

Zebra pattern on the bottom.

Wooden hearts from Michael's, and black glazing to tone down the red, as well as the sides, which looked too circus-like before .  


                        What do you think?                         
  BEFORE:


AFTER:

Let me know!

Love,
Suzanne
xoxo

check out my parties page to see where I linked up..
UndertheTableandDreaming


Wednesday, March 23, 2011

Crazy Cabinet

Good Day, and a happy Wednesday to all!

(What is a crazy caninet? I don't know, but for two days that is what this post was called...Can't believe I let that one slip for so long. To those of you who were confused, my apologies. To the rest of you: you are just as scatterbrained as I am. )

I am sooo excited to show you my latest project! It is something I have been wanting to do for a very long time..

My husband brought home a sweet little pine cabinet more than a year ago, that he found on the curb. It was my first piece of real furniture that I "found" for free, so I was pretty excited. It lived in my laundry this whole time, and I have had many different ideas for it through the months.
I want to kick myself for once again forgetting to take a before picture, but this is what it looked like after I had removed the doors and started sanding .Still sturdy, but definitely nothing to look at. No interesting features at all .
That is why I decided to go crazy on her with the paint .....
I have always liked the look, but never really thought I could do it myself, until I was inspired by these two awesome gals:
Mary at The Decorative Paintbrush, paints the funkiest, coolest furniture, AND she has some awesome tutorials  so we can try it, too.

 Pamela at Be Colorful , also paints wacky, brilliant, awesome furniture, plus she has a show, called The Travelling Door Show , where you can purchase her stuff.

If you like my project today, you HAVE to go check these two girls out, they are awesome.

 I did not heed Mary's advice to plan out my project on paper, though. I am too impatient, so I just started priming and painting , flying by the seat of my pants..
I knew I wanted some black and white, and I had just bought a gallon each of red and green oops paint, so that is what I started with.
The bottom shelf was painted black, ready to stencil some white words on...
 These are the doors, with the middle taped off for some animal print to follow.


The sides got flowers, painted on free hand, the black shelf got it's words, and don't you just love the black and white checkered look for the legs? Took me ages, or many nights in front of the TV, to fill those in, but I love the look.

 OK, now go back to the previous picture and notice the legs, or actually feet. See that it is plain, and square?
I got some wooden balls at Michael's and 4 flat wooden disc thingies, all of them with pre-drilled holes. I don't know what they were supposed to be, but I made them feet for my little cabinet. 
Doesn't that look so much cuter?

I decided to just decoupage the leopard print design on, since I already had this lovely leopard print gift paper.
That went on the sides and the centre of the doors.

The wooden hearts were bought at Michael's, too. I stencilled a sort of animal print on there.
Oh, and since you are wondering about the knobs, I got them at Michael's, too. A long time ago, at the dollar section. I just liked them, and knew I would use them some day.I thought it went well with the words on the bottom.

The top also got some leopard print, a heart , and some squirlies.
The zebra print on the corners was stencilled on. (You didn't think I was going to sit and paint it free hand, now, did you?)


Oi, I am in love with my little cabinet, even if I have to say so myself!


It is going on sale at the Barnsale at the end of the month....

Hope to see some of you there!

Love,
Suzanne
   xoxo


I am joining Debbie at https://lh3.googleusercontent.com/-MCYMGUmoGAY/TXUwjuV_eLI/AAAAAAAAHPc/js7-qRVW6-A/s640/P1040324.JPG

Check out my Parties Page for other parties I regulraly join..


Friday, March 18, 2011

Curbside Potting Table Gets a New Lease on Life

Hello, and welcome back!

I am trying to get a few pieces together for the Barnsale at the end of the month .  That, plus Springbreak , and an older son who has his own project going in the garage, means total and utter chaos in our household these days .

This is my "workspace" at the moment...

...and this is my son's.

 
Do you agree that we need a workshop?

My friend found this little lovely on the curb more than a year ago.

She promptly took it home , fully intending to make it beautiful again. But, as you know, life all too often gets in the way of our good intentions.So,  a year later , it was still looking miserable at her front door , exactly the same as the day she found it .When they moved to another house, she did not want to bother with it anymore, and passed it on to me.

The poor thing was falling apart. Almost every single nail had to be replaced, and all the screws tightened.
Wonderhusband helped me with this part. He is so sweet...
Then it got a good sanding from me, and started to look a little more respectable .

I primed with Kilz again, and spray painted with Krylon Ocean Mist. I still had three cans left over in my garage, so, once again, I am avoiding using the spray gun for the first time..

I sanded and distressed afterwards, to make it look naturally old, as I know its gonna get some character pretty soon if it was going to live outdoors in Arizona!

The block that covers the hole was just stained in dark brown.
Funny story : As I was finishing up with just a little more sanding here and there,  the husband of my friend who found the table
dropped the kids off , and saw me working on it. 
He looked at it, and asked if I was going to sand the whole thing down! 
Well, that was encouraging! lol.
I did feel like it needed something else, though.


I got a piece of peg board, and painted it to look almost moss covered, and nailed it to the back. This would be a good place to hang gloves, pruning scossors, etc.
I did the same paint effect on the drawers and a little on the lid.

Then I added a loose shelf at the bottom, for extra storage. Don't know if I should keep that there, or not.


There wasn't much that I could do about the mark on the metal part...it will just have to be  part of the character...
What do you think? Not bad for a curb find?
Hope to see all of you in the Phoenix area at the Barnsale!


Joining these parties:

Funky Junk's Saturday Nite Special


Sunday, March 6, 2011

Dry Sink

Hello There Fellow Bloggers!

Hope you are all enjoying the nice weather and are ready to welcome Spring.... What? It's still cold where you live? Then you must not live in Arizona, where we are having temperatures in the 80's these days.

Remember a while back I asked who knew what this was?
I am so lucky to have followers who are so clever, because quite a few of you responded and told me it is a Dry Sink. I found it at Goodwill, and it is definitely not a real antique, more like a very recent fake one from a furniture chain store, but it looked cool never the less.
I loved all the metal details and the glass doors looked like it could be made to look like old metal tiles.
When I googled "dry sink", I saw a lot of very cool, really old ones, or reproductions that were made to look really old. I loved the look, and decided to try and imitate that.
I really want  to try and  save money, and  not use spray cans so much anymore.
 I still primed with Kilz spray primer, though, because I wanted the primer to be smooth and quick drying, and I still had some cans in the garage.
I also removed the left bar that looked like a wine rack, because I could not for the life of me make any sense of it.

I found some paint base on sale at Walmart, and had it tinted in this delicious red. This time I painted it with a small roller and a brush, because I wanted the look of painted brush strokes, like it was painted ages ago. Ok, ok,  I admit, and  I am nervous to use my new paint sprayer!
 One thing about this project;  from the before, to every step in between, I liked it enough to just keep it that way, too.
Don't you just love this red?

But, the plan was for it to look old and that meant some heavy distressing....
Loved this look, too.

I used mahogany wood stain to antique it with. Painted it on with a brush, especially in the corners, and on the places where the bare wood was showing as a result of the sanding. Then wiped it off with an old t-shirt. (which I got in trouble for, because Princess saw it and insisted she still used it to sleep in....O well)   

  OOO! I almost forgot to tell you about the hardware...I wanted to do something different than my usual "sprayed with Oil Rubbed Bronze" look, plus it had to look really old to go with the look of the rest of the piece. So, I used the Metal Effects from Modern Masters that I told you about here . 
And no, they still have
not offered me commission for the free advertising. But I forgive them, because I like their product so much.
And I am just a nice person like that...  ;-)

                                     This time I got the bronze base, and the green patina developer.
I love it!!!

I did the same treatment on the glass panels of the doors, so it would look like metal. This picture makes it look like the glass panels could use a little more patina..I will see what I can do about that.               

And here it is in all its cuteness..

Have another look....

What do you think?
BEFORE:
AFTER:
This piece will be for sale together with a lot of other cool stuff from me and other bloggers at a Barn Sale, in Scottsdale,  March 31, and April 1st and 2nd.

If you live near or in Phoenix, we hope to see you there!

Love,
Linking up with:


Becolorful
Anything Related
PhotobucketShow and Tell Green